Shopping White Water, Part 1
With 6 weeks off and my White Water reset issue still around, I decided now would be a good time to do a little maintenance on the machine. I'm not going to do a full shop and strip the playfield or remove inserts, although I will remove the upper playfield. The main areas I want to address are:


- Cleaning the playfields
- Inspecting and cleaning ramps
- Rebuilding flippers
- Replacing cracked mountains
- Polishing metal parts
- Inspecting wiring, solenoids and switches
- Adding metal playfield protectors
- Replacing all rubber rings
- Upgrading the sound system
- Add some LEDs in strategic locations to reduce heat and stress on the GI
- Creating some new mods
I knew this game was a project machine when I bought it, but I didn't know how just how bad things were until I took a closer look. It has less than 100 plays on it by me, and has sat pretty much unused since the reset issue first appeared in 2005. I'm taking photos along the way to document the process...
The first thing I wanted to do was pull the upper playfield. This requires doing the following:
- Turn off power, remove glass, remove pinballs.
- Lift the playfield and disconnect all electrical connectors to the upper playfield and all ramps. To make sure I could match everything properly, as I disconnected each one I wrote a letter on both the male and female molex on each connector with a Sharpie (i.e. A, B, C, etc.). There are about 12 to 15 connectors total.
- Drop the playfield back down, pull it out a little, and remove the back mountains.
- Remove all the screws on the Waterfall ramp (the long one on the left).
- Remove the dual gate assembly on the upper ramp.
- Remove the two screws from the bracket holding the Waterfall ramp to the upper playfield and pull the Waterfall ramp out.
- Remove the long wire ramp coming off the shooter lane on the right side.
- Remove the two screws from the bracket that holds the Lower to Upper ramp to the lower playfield (this is the leftmost ramp when the Waterfall ramp has been removed).
- Remove the screws that hold the Upper to Lower ramp to the playfield (this is the ramp that feeds the ball into the right inline).
- There are 4 nuts the hold the upper playfield in place. The location of one of the nuts in the manual is wrong, showing it at the bottom left of the upper playfield - it is actually closer to the top, up by where the dual gate assembly was removed.
- You are now able to remove the upper playfield. It requires a little wiggling so this must be done carefully.
White Water definitely has the most ramps in pinball. I don't think you can appreciate Dennis Nordman's design unless you take it apart. Brilliant! Anyway, this is what the upper playfield looked like removed:

A close-up photo shows how much I cringed when I saw the spot where the upkicker deposits the ball:

The black "trail" is dirt. The white is some kind of tape attached to the playfield. I prayed that the tape protected the playfield. After removing the wire upkicker ramp and the Bigfoot ramp from the upper playfield, we can get a better look:

I peeled the tape off and set to work cleaning with Simple Green and a microfiber cloth. While the playfield did clean up well, a groove was worn into the playfield by the ball, and you can see where bare wood has been exposed. After fixing this area, it's definitely going to get a protector! At least the tape seemed to help a little bit - I've seen a lot worse! There was supposed to be mylar here, but it must have worn down and been replaced with the tape.

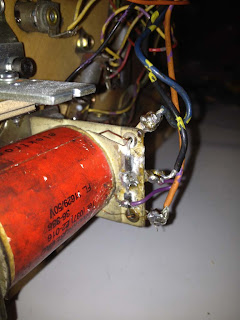
Since I've been having reset issues, I was curious to see what the upper right flipper assembly looked like:

Yuck! Ill be doing some work on this. A quick glance at the lower playfield shows me a lost ball!

With the upper playfield cleaned as best I can for now, in the next post I'll turn my focus to the ramps...

.jpg)
Comments
Post a Comment